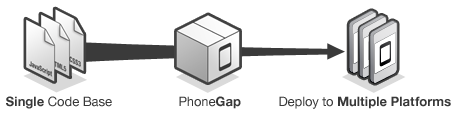
PhoneGap 最初是由「Nitobi」這間位於加拿大的公司在2008年8月所發起的,而到2010年中IBM也開始參與投入研發。它是一套能讓你選擇採用「New BSD」或「MIT」license的Open Source Mobile Framework,它主要的目的在於能讓開發人員透過一些Web技術(HTML+JavaScript)來存取行動裝置的Native API,而且它支援了Android、iOS、Blackberry、WebOS、Windows Phone 7等平台的支援,就在上個月的29日它發佈了PhoneGap 1.0.0。
開發人員只需要撰寫一份HTML+JavaScript的程式,就可以在這些平台上存取這些行動裝置所提供的功能,如:Camera, Compass, Contacts等...,然而為何需要有這個Framework的存在呢?這最大的原因就在於我們現階段仍無法透過Web來存取上述這些裝置功能,而W3C雖然正在針對行動裝置制定標準的Device APIs,不過現階段仍無法透過Web來存取照相機或相簿等功能(Android 3.0將支援Media Capture API),所以你可以將PhoneGap當做是一個「過渡性」的產品,或者等未來Web都已支援這些Native APIs,但卻有一致性或相容性等其它問題時,也許那時PhoneGap仍然是一個好的選擇,這就像是HTML5與Flash現階段的情況,看看Google+首波合作的遊戲商就可以知道了.. 16款遊戲中有15款採用Flash來開發。
探討 PhoneGap 1.0.0 for Android
本文並不是一篇教你如何使用PhoneGap建立HelloWorld的無痛上手,而是將深入探討PhoneGap 1.0.0在Android平台上如何扮演Web與Native API之間的橋梁角色,有興趣的朋友請至Github - phonegap下載。
本文會採用Notification.alert這個簡單的API來說明這之間的流程,至於為什麼JavaScript上早已經有alert功能,為何還需要Notification.alert呢?這兩者之間最大的差別就在於Notification.alert可以讓你「客製化」一些資訊,如:標題(title)或按鈕上的文字(buttonLabel)。
下述是PhoneGap所定義的Notification.alert的API
navigator.notification.alert(message, alertCallback, 〔title〕, 〔buttonName〕)
用法如下:
function alertDismissed() {
    // do something
}
navigator.notification.alert(
    'You are the winner!',  // message
    alertDismissed,         // callback
    'Game Over',            // title
    'Done'                  // buttonName
);
JS - Notification.prototype.alert
接著直接將PhoneGap的JS原始碼翻來看(phonegap-1.0.0.js),它會執行「PhoneGap.exec」。
Notification.prototype.alert = function(message, completeCallback, title, buttonLabel) {
    var _title = (title || "Alert");
    var _buttonLabel = (buttonLabel || "OK");
    PhoneGap.exec(completeCallback, null, "Notification", "alert", [message,_title,_buttonLabel]);
};
JS - PhoneGap.exec
這部份就是JavaScript如何和Native API溝通的橋梁,這裡有個「callbackId」,它是由「service name + counter」所組成的,例:Notification2,並以此callbackId為key,以callback funcation為value先暫存在PhoneGap.callbacks的陣列。
PhoneGap.exec = function(success, fail, service, action, args) {
    try {
        var callbackId = service + PhoneGap.callbackId++;
        if (success || fail) {
            PhoneGap.callbacks[callbackId] = {success:success, fail:fail};
        }

        var r = prompt(PhoneGap.stringify(args), "gap:"+PhoneGap.stringify([service, action, callbackId, true]));
而重點就在於下面這一行:
var r = prompt(PhoneGap.stringify(args), "gap:"+PhoneGap.stringify([service, action, callbackId, true]));
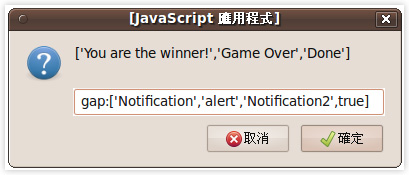
「prompt」?沒錯~ PhoneGap 1.0.0 for Android就是透過JavaScript的「prompt」function將相關參數傳到原生的Java程式中,為何能這樣達成?原因就在於Android所設計的WebView元件,它讓開發人員能夠透過WebChromeClient來自訂JavaScript中的alert, confirm, prompt等功能的處理方式,而上述函式實際傳送到Java中的參數其實就如下圖所示:
DroidGap.java - onJsPrompt
上述所提供的「prompt」實際上就是呼叫DroidGap.java中的「onJsPrompt」函式(line:868),更確切的說「onJsPrompt」是被宣告在GapClient(inner class)中,詳細的細節請參考Source code。
public boolean onJsPrompt(WebView view, String url, String message, String defaultValue, JsPromptResult result) {
而「onJsPrompt」處理的方式就是先判斷所傳進來的「defaultValue」是否為「gap:」字串開頭,以本文的為例就是將「gap:['Notification','alert','Notification2',true]」進行拆解,再透過「pluginManager.exec」去執行。
if (reqOk && defaultValue != null && defaultValue.length() > 3 && defaultValue.substring(0, 4).equals("gap:")) {
       	JSONArray array;
        try {
        	array = new JSONArray(defaultValue.substring(4));
        	String service = array.getString(0);
        	String action = array.getString(1);
        	String callbackId = array.getString(2);
        	boolean async = array.getBoolean(3);
        	String r = pluginManager.exec(service, action, callbackId, message, async);
        	result.confirm(r);
        } catch (JSONException e) {
        	e.printStackTrace();
        }
}
PluginManager.java
基本上在PhoneGap for Android的原始碼中,它所提供的各式API也都稱為Plugin,意指為:Notification、Compass、Camera..等都稱為Plugin,實際上這些一個個的功能也都繼承於Plugin class(它實作IPlugin介面),所以該PluginManager就是用來管理這些Plugin。
在「pluginManager.exec」的函式中,主要就是取得這些特定的Plugin物件,並透過「plugin.execute」來執行。
PluginResult cr = plugin.execute(action, args, callbackId); //line:119 in PluginManager.java
Notification.java
由於本文以Notification為例,所以上述函式(plugin.execute)會執行「Notification.execute」。
public PluginResult execute(String action, JSONArray args, String callbackId) {
		PluginResult.Status status = PluginResult.Status.OK;
		String result = "";

		try {
			if (action.equals("beep")) {
				this.beep(args.getLong(0));
			}
			else if (action.equals("vibrate")) {
				this.vibrate(args.getLong(0));
			}
			else if (action.equals("alert")) {
				this.alert(args.getString(0),args.getString(1),args.getString(2), callbackId);
				PluginResult r = new PluginResult(PluginResult.Status.NO_RESULT);
				r.setKeepCallback(true);
				return r;
			}
從「Notification.execute」可以得知,它同時處理了Notification中的「beep」、「vibrate」、「alert」等功能,而實際的「alert」功能實現如下:
public synchronized void alert(final String message, final String title, final String buttonLabel, final String callbackId) {

	final PhonegapActivity ctx = this.ctx;
	final Notification notification = this;

	Runnable runnable = new Runnable() {
		public void run() {

			AlertDialog.Builder dlg = new AlertDialog.Builder(ctx);
			dlg.setMessage(message);
			dlg.setTitle(title);
			dlg.setCancelable(false);
			dlg.setPositiveButton(buttonLabel, new AlertDialog.OnClickListener() {
				public void onClick(DialogInterface dialog, int which) {
					dialog.dismiss();
					notification.success(new PluginResult(PluginResult.Status.OK, 0), callbackId);
				}
			});
			dlg.create();
			dlg.show();
		};
	};
	this.ctx.runOnUiThread(runnable);
}
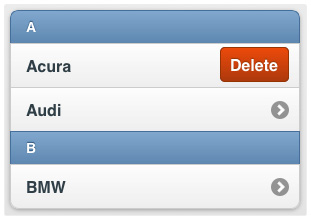
實際上透過Android原生的「AlertDialog」來呈現對話框的介面。
至於點擊按鈕之後的callback應用就留待有興趣的朋友自行研究了~ 不過簡單來說它就是透過前端的Ajax(採用Recursive function)不斷地向原生Java中的CallbackServer.java(ServerSocket)請求,若有資訊(callbackId等)就回傳給前端的Ajax。