blog.Ring.idv.tw

PSP

標籤雲(Tag Cloud)

Tag Cloud(或word cloud).它屬於視覺化介面的一種呈現方式~ 基本上是透過字母的排列順序和次數權重來決定字型大小的呈現,根據wikipedia的記載~ Tag Cloud最初是由Flickr率先開始使用,至於這個詞是由誰提出來的.. 筆者尚未找到有力的參考文獻~

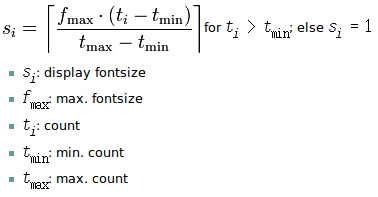
另外Tag Cloud - Wiki也提供了「Computation of the tag size」公式計算,如下所示:

套用此公式的結果:

從上圖的結果可以發現,上述公式對於權重和字型大小之間的運算結果,會導致字型範圍「1px」至「20px」的情形發生,但基本上當字型大小小於「10px」就不容易閱讀和點選,所以筆者修改了此公式,希望它能自行定義Tag Cloud的字型大小範圍「10px」至「20px」,如下圖所示:

如此便能依照權重比例和字型大小形成相互的對應:

index.py

#! /usr/bin/python
from mod_python import psp

def index(req):
        param = {}
        req.content_type = 'text/html'
        tags = [('aggregators',2),('blogs',3),('wikis',4),('usability',5),('widgets',6),('ajax',7),('social',10),('Folksonomy',15)]
        tags.sort()
        param['Tags'] = tags

        tmpl = psp.PSP(req,'index.tmpl')
        tmpl.run(param)

index.tmpl

<html>
<head>
<title>Tag Cloud</title>
<meta http-equiv="Content-Type" content="text/html; charset=utf-8" />
<style type="text/css" media="all">
.tagcloud
{
        width: 200px;
        height: 100px;
}
</style>
</head>
<body>
<div class="tagcloud">
<%
Clist = [_t[1] for _t in Tags]
Tmax = max(Clist)
Tmin = min(Clist)
Fmax = 20
T = Tmax - Tmin

for _t in Tags:
        if _t[1] > Tmin:
                si = Fmax * (_t[1] - Tmin) / T 
        else:
                si = 1
        
%>
<span style='font-size: <%=si%>px'><a href="#"><%=_t[0]%></a></span> 
<%
# end for
%>
</div>
<div class="tagcloud">
<%
Fmin = 10

for _t in Tags:
        if _t[1] > Tmin:
                si = (Fmax - Fmin) * (_t[1] - Tmin) / T + Fmin
        else:
                si = Fmin
        
%>
<span style='font-size: <%=si%>px'><a href="#"><%=_t[0]%></a></span> 
<%
# end for
%>
</div>
</body>
</html>

2009-08-12 01:02:07 | Add Comment

Python Server Pages - Fruit Suggest

今天處理了一台伺服器~ 整個給它重灌Debian 4.0r4~ 因為這台伺服器先前被SSH-Attack~ 所以連IP都被封鎖住~

所以千萬別認為裝了「SSH」就絕對安全~ 因為總是有「無聊」的人會利用工具來做「暴力字典攻擊法」想辦法入侵... 所以防火牆的設定是不可少的~ 真搞不懂為什麼有人那麼「無聊」..= ="(我時間都不夠用了~)

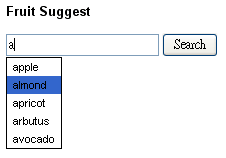
好了~ 這不是重點~ 這篇的重點在於測試一個「Python Web Application」~ 我給它的主題就叫做「Fruit Suggest」~ 從名稱來看就知道和「Google Suggest」脫離不了關係~

是的~ 這個範例會結合「Python Server Pages」、「SQLite3」、「YUI Ajax」、「Google Suggest」和「PSP Template」,並且在「Debian Linux」的環境下執行~

我想~ 用一個最實際的簡單案例就是最好的驗證!!

不過~ 一開始還遇到許多問題~ 由於「Debian 4.0r4」預設是安裝「Python 2.4.4」版本~ 但是~ 我想用最新的「Python2.5」來執行這樣的環境~ 畢竟它有整合了「SQLite」~

所以要處理解決「Python2.5」的環境~ 筆者採用自行編譯「mod_python」的方式來處理~ 所以捨棄apt安裝「libapache2-mod-python」的方式~

如果你也需要這樣的解決方案~ 請參考「Jason R Briggs · mod_python and python2.5」的說明~

Fruit Suggest

.htaccess

SetHandler mod_python
PythonHandler mod_python.publisher
PythonDebug On

<Files ~ "\.(gif|html|jpg|png|js|css)$">
   SetHandler default-handler
</Files>

index.html

<html>
<head>
<title>Fruit Suggest</title>
<script src="http://yui.yahooapis.com/2.5.2/build/yahoo/yahoo-min.js"></script>
<script src="http://yui.yahooapis.com/2.5.2/build/event/event-min.js"></script>
<script src="http://yui.yahooapis.com/2.5.2/build/connection/connection-min.js"></script>
<style type="text/css" media="screen">
			body {
				font: 11px arial;
			}
			.suggest_link {
				background-color: #FFFFFF;
				padding: 2px 6px 2px 6px;
			}
			.suggest_link_over {
				background-color: #3366CC;
				padding: 2px 6px 2px 6px;
			}
			#search_suggest {
				position: absolute; 
				background-color: #FFFFFF; 
				text-align: left; 
				border: 1px solid #000000;			
			}		
</style>
<script language="JavaScript" type="text/javascript" src="ajax_search.js"></script>
</head>
<body>
		<div style="width: 500px;">
		<h3>Fruit Suggest</h3>
			<form id="frmSearch">
				<input type="text" id="txtSearch" name="txtSearch" alt="Search Criteria" onkeyup="searchSuggest();" autocomplete="off" />
				<input type="submit" id="cmdSearch" name="cmdSearch" value="Search" alt="Run Search" /><br />
				<div id="search_suggest">
				</div>
			</form>
		</div>
</body>
</html>

ajax_search.js

function searchSuggest()
{
	var callback = {
		success: function(o)
		{
			var ss = document.getElementById('search_suggest')
			ss.innerHTML = '';
			var str = o.responseText.split("\n");
		
			for(i=0; i < str.length - 1; i++)
			{
                                if(str[i] != "")
                                {
                                        var suggest = '<div onmouseover="javascript:suggestOver(this);" ';
                                        suggest += 'onmouseout="javascript:suggestOut(this);" ';
                                        suggest += 'onclick="javascript:setSearch(this.innerHTML);" ';
                                        suggest += 'class="suggest_link">' + str[i] + '</div>';
                                        ss.innerHTML += suggest;
                                }

			}
		},
		failure: function(o)
		{
			alert("Ajax failed!");
		}
	}
	var str = escape(document.getElementById('txtSearch').value);
	var transaction = YAHOO.util.Connect.asyncRequest('GET', '/ajax/ajax/index?search=' + str, callback, null);
}

//Mouse over function
function suggestOver(div_value) {
	div_value.className = 'suggest_link_over';
}
//Mouse out function
function suggestOut(div_value) {
	div_value.className = 'suggest_link';
}
//Click function
function setSearch(value) {
	document.getElementById('txtSearch').value = value;
	document.getElementById('search_suggest').innerHTML = '';
}

ajax.py

from mod_python import apache, psp
from cgi import escape
import sqlite3

def index(req):
	req.content_type = 'text/html'
	template = psp.PSP(req, filename='suggest.tmpl')
	_uid = req.form.getfirst('search')
	_uid = escape(_uid)+'%'
	conn = sqlite3.connect('/var/www/ajax/data.dat')
	c = conn.cursor()
	c.execute('select name from fruit where name like :who', {"who": _uid})
	res = c.fetchall()
	template.run({'search':res})

suggest.tmpl

<%
for f in search:
%>
<%=f[0]%>
<%
%>

data.dat (sqlite)

Fruit table的結構如下:

create table fruit(
	id int,
	name varchar
)

insert into fruit values (1,'apple')

Fruit Suggest 範例下載

Fruit Suggest.zip

參考資源

打造屬於你自己的Google Suggest!

2008-10-02 02:55:52 | Comments (2)

Python Server Pages - SQLite3

由於自從Python 2.5推出之後,它就內含了「SQLite (lightweight disk-based database)」,它是一個C library~ 所以有相當多的平台都將它當作內部的儲存方式,好比如:Google Android、Adobe AIR、Google Gears..

所以這篇主要記錄一些簡單的操作~ 感覺有點像一般小型ASP+Access網站的架構模式~

範例如下:

db.py

from mod_python import apache, psp
import sqlite3

def index(req):
	req.content_type = 'text/html'
	conn = sqlite3.connect('data.dat')
	c = conn.cursor()

	c.execute('''
	create table members(
		id int,
		name varchar,
		login timestamp
	)
	''')
	 
	c.execute('''
	insert into members
	values (1,'jeff','2006-10-01')
	''')
	c.execute('''
	insert into members
	values (2,'angie','2006-10-02')
	''')
	c.execute('''
	insert into members
	values (3,'dylan','2006-10-03')
	''')
	
	conn.commit()
	c.execute('select * from members')
	res = c.fetchall()

	who = "jeff"
	c.execute("select id,name,login from members where name=:who", {"who": who})
	jeff = c.fetchone()

	template = psp.PSP(req, filename='db.tmpl')
	template.run({'results':res,'jeff':jeff})

db.tmpl

<html>
<p><%=jeff%></p>
<%
for f in results:
%>
<%=f[0]%><%=f[1]%><%=f[2]%><br/>
<%
%>
</html>

相關資源

sqlite3 -- DB-API 2.0 interface for SQLite databases

2008-10-01 02:36:50 | Add Comment

Python Server Pages - Nested PSP Templates

在上一篇「Python Server Pages - Forms」已經簡單的記錄一下「Form」的處理~

而這篇則是針對如果我們想在同一份頁面中~ 分離多個「Template」來進行處理~ 它就稱作「Nested PSP Templates」。

我們仍然以上一篇文章的例子來作解釋以方便理解。

Nested PSP Templates

「form.html」不需要變動到它,只要更動「index.py」和相關的「templates」即可。

index.py

from mod_python import apache, psp

def index(req,userid,fruit):
	req.content_type = 'text/html'
	uid_temp = psp.PSP(req, filename='uid.tmpl',vars = {'uid':userid})
	fruit_temp = psp.PSP(req, filename='fruit.tmpl')
	fruit_temp.run({'fruit':fruit,'uid_temp':uid_temp})

從這個例子可以發現,我們同時使用到「uid.tmpl」和「fruit.tmpl」來處理同一份頁面。

uid.tmpl

<h1>Hello, <%=uid%></h1>

fruit.tmpl

<html>
<%=uid_temp%>
<%
for f in fruit:
%>
<%=f%>
<%
%>
</html>

在這個範例上,整個重點就在於「uid_temp」已經優先被剖析和編譯了,直到執行「fruit_temp.run()」時才會整個傳送到Client端~

相關資源

4.9 psp - Python Server Pages

2008-10-01 01:43:01 | Add Comment

Python Server Pages - Forms

先前筆者有寫了一篇簡單的PSP(Python Server Pages)介紹「Python Server Pages - 架構一個PSP環境」,不過那篇是針對「Windows」環境下的設置~ 如果我們要在「Linux」的環境下Run的話~ 同樣地~ 安裝「libapache2-mod-python」即可。(請注意:Debian 4.0r4 預設是Python2.4,若你要安裝Python2.5請參考「Jason R Briggs · mod_python and python2.5」)

如下:

apt-get install libapache2-mod-python

且先前的「Hello World」範例就直接用「Templating System」來實作了~ 因為透過「templating mechanism」可以幫助我們將「Business Logic」和「Presentation」來做個分離~ 以後在維護上就會較方便,且容易除錯~

而這篇主要來記錄PSP是如何處理「Form」,就直接看下述範例:

Python Server Pages - Forms

如同先前所介紹的,這邊我們仍然以「psp」的目錄來測試。

.htaccess

SetHandler mod_python
PythonHandler mod_python.publisher
PythonDebug On

<Files ~ "\.(gif|html|jpg|png)$">
   SetHandler default-handler
</Files>

form.html

<html>
<body>
<form action="/psp/" method="post">
<p>UserID: <input type="text" name="userid">
<br/>
<input type="checkbox" name="fruit" value="apple">Apple
<input type="checkbox" name="fruit" value="banana">Banana
<input type="checkbox" name="fruit" value="grape">Grape
<input type="submit" value="Submit"></p>
</form>
</body>
</html>

index.py

from mod_python import apache, psp
from cgi import escape

def index(req):
	req.content_type = 'text/html'
	template = psp.PSP(req, filename='hello.tmpl')
	_fruit = req.form.getlist('fruit')
	_fruit = map(lambda fruit: escape(fruit), _fruit)
	_uid = req.form.getfirst('userid')
	_uid = escape(_uid)
	template.run({'uid':_uid,'fruit':_fruit})

hello.tmpl

<html>
	<h1>Hello, <%=uid%></h1>
<%
for f in fruit:
%>
<%=f%>
<%
%>
</html>

最後打開你的瀏覽器,輸入「http://localhost/psp/form.html」來測試~ 應該就沒啥問題了!

從這個例子我們可以知道說~ 要取得「Form」的資料必須透過「Request」這個物件裡面的「form」attribute來取得~

重點在於「form」attribute就是FieldStorage類別的instance,而它儲存了一份reference在「Request」物件中的「form」attribute

雖然我們可以透過「FieldStorage」來取得「Form」的資料~ 但其實還有更快的方式~

我們可以直接利用定義函式中所要傳入的參數來對應即可~ 如下所示:

def index(req,userid,fruit):
.....

只要參數名稱對應「Form」的欄位名稱即可。

2008-10-01 01:17:11 | Add Comment

Previous Posts
Copyright (C) Ching-Shen Chen. All rights reserved.

::: 搜尋 :::

::: 分類 :::

::: 最新文章 :::

::: 最新回應 :::

::: 訂閱 :::

Atom feed
Atom Comment